📚 Elevate your space with style and strength — because your books deserve the best!
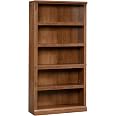
The Sauder Miscellaneous Storage 5 Split Bookcase offers a sleek oiled oak finish and a compact footprint (35.28"W x 13.23"D x 69.76"H) ideal for any room. Featuring three adjustable shelves with a combined 420 lbs weight capacity, it provides flexible, heavy-duty storage. Safety is prioritized with a wall anchor kit included, and assembly is streamlined through clear instructions and patented slide-on moldings. Backed by a 5-year limited warranty, this freestanding engineered wood bookcase blends durability with transitional style.


| Room Type | Office |
| Number of Shelves | 5 |
| Special Feature | Adjustable |
| Product Dimensions | 13.23"D x 35.28"W x 69.76"H |
| Style | Transitional |
| Age Range (Description) | Adult |
| Finish Type | Oiled Oak |
| Brand | Sauder |
| Product Care Instructions | Wipe with Dry Cloth |
| Size | L: 35.28" x W: 13.23" x H: 69.76" |
| Weight Limit | 420 Pounds |
| Assembly Required | Yes |
| Recommended Uses For Product | Home Decor |
| Number of Items | 1 |
| Manufacturer | Sauder Woodworking |
| Included Components | Materials, Hardware, Assembly instructions |
| Model Name | Miscellaneous Storage |
| Item Weight | 88 Pounds |
| Furniture Finish | Oiled Oak |
| Installation Type | Freestanding |
| Min. Required Door Width | 40 Inches |
| Weight capacity | Maximum weight: 420 Pounds |
| Back Style | Closed Back |
| Specific Uses For Product | Books |
| Unit Count | 1.0 Count |
| Product Name | bookcase |
| Shelf Thickness | 0.63 Inches |
| Global Trade Identification Number | 00042666103275 |
| UPC | 042666103275 |
| Item Weight | 88 pounds |
| Country of Origin | USA |
| Item model number | 410367 |
| Is Discontinued By Manufacturer | No |
| Weight | 88 Pounds |
A**R
Sturdy, inexpensive, big & classy!
I'm very satisfied with the Sauder 5-shelf bookshelf I purchased. The finished product looks excellent and very classy for the price. Although it's made of manufactured wood, it feels incredibly sturdy, much higher quality than cheaper made-in-China furniture. Assembly was easy and the instructions were clear. My only criticism is that the labeling of bagged parts (screws) is not dyslexia friendly (ex: S23 vs S32). Read the instructions carefully and make sure you grab the correct part. As a closing note, the bookshelf looks so great in my room and I'll be considering more Sauder furniture to tie the room together.
A**N
Heavy, but worth it!
Very sturdy and well made book case. I highly recommend having 2 people to put it together, I did it by myself but a few of the steps were quite difficult with only one person. Once it was finished though the book case feels very sturdy and durable. The quality of materials is very very nice.
K**M
Gorgeous Finish on Particle Board
I bought and assembled three of theseshelf units. In my home office, they arevery useful and look really nice. I gotthe cherry finish, and it is justgorgeous, prettiest furniture finish Iever saw.From 15 feet away, one of the shelf unitslooks nice enough for nearly any office orliving room. But since the unit isdesigned to be assembled by the customer,up close it does not look quite as nice ashigh quality traditional furniture making.While the unit seems designed well enoughfor its intend purpose and usage, due tothe particle board, the unit does not lookas rugged as, say, some units I have insolid oak from about 100 years ago.There is an instruction book thatdocuments how to assemble the unit in 14steps. The 'technical writing' is verygood.Along with the particle board pieces,there are some small pieces, nearly allmetal. All these small pieces come in aplastic bag. Suggestion: Get 12 littlebowls and sort each piece type into itsown bowl.Some of the details of how the shelves areassembled are innovative. Mostly theshelves are held together with some 'pins'and 'cams'.For joining two pieces of the particleboard, say, X and Y, piece X has a holefor a pin and piece Y has a correspodinghole for the other end of the same pinand, at the end of that hole, a hole inthe surface for a cam. Then when pieces Xand Y are joined, one end of the pin willbe in the hole in piece X and the otherend in the hole and cam of piece Y.The pin is a little complicated: The endthat goes into the cam has a grove thatfits into the side of the cam and getspulled on as the cam is turned. The otherend has some tough, black plastic. Whenthe cam is turned, the pin tries to slideout of the black plastic, and the blackplastic expands and makes the pin tight inthe hole in piece X.Suggestion: Put the pin in the hole inpiece X and then move piece Y to slide itshole over its end of the pin.If the pin is in piece Y first, then asmove pieces X and Y into position and getthe pin in its hole in piece X, theplastic can be damaged and have its end ofthe pin no longer fit in the hole in pieceX. When this happened to me, I just useda knife to trim a little of the blackplastic. But, still, I suggest, put thepin in the hole in piece X first, makingthe black plastic safe, and then movepiece Y in position. The end of the pinwith the plastic is delicate; the otherend is not.Mostly the unit is to be assembled on afloor, on its back. You may want somegood knee pads -- not a joke.Okay, there is a risk of damaging the unitand, thus, have to be careful. In detail,there are 6 shelves, three are adjustable.For the other three, there is the top, thebottom, and one between those two.The top and the bottom have decorativepieces. Then to attach the back, flip theunit on its front and have the back up.The two decorative pieces will then be incontact with the floor, and due to thesedecorative pieces, the 'between' shelfwill NOT be in contact with the floor andwill be about 2 inches from the floor.THEN: Do NOT lean on the shelf unit!! Iflean very hard, say, using the unit tohelp stand, can have a pin be pulled outof its hole bringing much of particleboard surface of its hole along with it.Solution: Get two thick books, say, 1000pages each, and put one at each end of the'between' shelf and between that shelf andthe floor. Then can lean on the unitwithout damaging it.The back is thin, made of two pieces, andget attached with 3/4 inch long nails.Budget the use of the nails or might runout. I wanted more nails. The nails thatcome with the unit are good, and wouldhave to look carefully to find extras justas good.In attaching the back pieces, should gettheir position accurate within about 1/16of an inch everywhere. With lessaccuracy, might have some of the backextend beyond the unit. Also each of thenails has to go into the edge of a pieceof particle board, hopefully into thecenter of that edge. Else the nail canprotrud from and damage the surface of theboard. Also want each nail not too closeto the edge of the back. Such alignmentneeds the 1/16" accuracy.One piece of the back, the 'upper' piece,covers from the 'between' board to the topboard. This piece attaches first. Theother piece, the 'lower' piece, coversfrom the 'between' board to the bottomboard and overlaps the upper piece wherethe upper piece already covers the edge ofthe 'between' board.Then, of course, the part of the unitwhere the upper piece attaches mayslightly fail to be a rectangle. So, getthe upper piece very carefully positionedso that its lower edge just covers theedge of the 'between' board and nail thepiece to the 'between' board. Then 'skew'the upper part of the unit so that it isaccurately a rectangle, put a nail in eachof the two upper corners of the upperpiece to hold the alignment achieved, andthen put in the rest of the nails in theupper piece. That is, to get the upperpiece attached within 1/16", expect tohave to use some 'skew'.Similarly for the lower piece.There is a chance that, at the edge of the'between' board, a nail for the lowerpiece could hit a nail for the upperpiece. So, after nailing the upper pieceto the edge of the 'between' board, foreach of those nails mark on the upperpiece a little above the 'between' boardwhere the nail is so that when nailing thelower piece can avoid each nail already inthe upper piece.When nailing the lower piece to the upperpiece and into the edge of the 'between'board, for each nail need some way to knowwhere to start the nail to have it enterthe center of the edge of the 'between'board. At the ends of the 'between'board, it is easy to locate nailscorrectly. So put a nail at each end andhave a loop of kite string from one of thenails to the other and then to a hangingweight to make the string tight andstraight. Then put the rest of the nailsin the bottom piece between the two piecesof string. Or use a chalk line or draw aline using a yard stick as a straightedge.The 'between' board gets a piece of edgetrim. It is to be attached with rightangle brackets. Each bracket gets twosmall screws. The instructions say thatthis piece of edge trim should be attachedwhen the unit is on its back on the floor.With the unit in this position, the littlescrews are very awkward to install, wouldbe easier for someone the size of akitten. An easy solution is to lift theunit to the vertical with the top down.Then the screws are easy to install.There are several screws. They all need a#2 Phillips head screwdriver.For installing the nails, finally Idecided to use two extra tools, a pair ofneedle nose pliers and a strongflashlight. Then for each nail, hold itjust under its head in the tip of thepliers. Use the flashlight to remove allshadows from the desired location of thenail. Then position the tip of the nailcarefully, make the nail vertical, give atap or two with the hammer, move thepliers out of the way, and finish drivingin the nail. The unit comes with a littleplastic gauge for such positioning, butwhen I squeezed a nail, it would jump outof the plastic and land a foot or twoaway.
K**R
Good product
I would gladly pay an additional five or ten dollars if Sauder were to use packing materials that don't require an extra 20 minutes of cleaning up during the unpacking process. Their styrofoam leaves tiny bits on the wood that are held tightly to the materials by static electricity. Even a Dustbuster portable vacuum had a hard time picking them up.As far as the product is concerned, it's similar to many of the other Sauder and non-Sauder products that I have put together. The instructions are fairly clear, and even show that the authors have a bit of a sense of humor. The pieces fit together pretty well, and as long as you double-check your steps, you shouldn't have a problem. (I didn't double-check, and wound up with a problem that we ended up solving. It was my fault).We haven't loaded any books on it yet, but I expect it to work as one would expect a bookcase to work. If we have any unexpected issues, I'll update this review.
Trustpilot
1 month ago
4 days ago