معلومات عنا
دعم العملاء
احصل على التطبيق

قم بتوجيه الكاميرا لتنزيل التطبيق
حقوق الطبع والنشر © 2024 Desertcart Holdings Limited


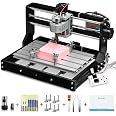
⚡ Unlock your creative edge with precision CNC power!
The Genmitsu CNC 3018-PRO is a compact, professional-grade 3-axis router kit featuring a 300x180x45mm working area, UL-approved 24V power supply, and compatibility with a 20,000 RPM spindle. It supports a wide range of materials including plastics, soft aluminum, wood, acrylic, PVC, and PCBs. Designed for easy assembly and controlled via industry-standard GRBL software on Arduino, it offers expandability with optional 3040 extension kits, making it ideal for millennial makers and professionals seeking precision and versatility in desktop CNC machining.


| Manufacturer | SainSmart |
| Part Number | B07P6K9BL3 |
| Item Weight | 15.33 pounds |
| Product Dimensions | 7.09 x 0.01 x 11.81 inches |
| Item model number | 3018-PRO |
| Style | 3018-PRO |
| Thickness | 0.1 Millimeters |
| Power Source | Corded Electric |
| Voltage | 24 Volts |
| Horsepower | 120 |
| Item Package Quantity | 1 |
| Included Components | Wood Carving Milling Engraving Machine |
| Batteries Included? | No |
| Batteries Required? | No |
C**D
Trust yourself and get this
I was just like you, reading reviews and contemplating if I should meander in to the world of CNC machines, a world that I know nothing about. If you're searching for these machines, you're already interested - so the only thing I can tell you is - get it.I have basic knowledge when it comes to electronics/hardware/software, if you're completely new to these things, the setup and usage may be slightly intimidating, but it IS easy enough that anyone can do it by following basic instructions. Like most mention - instruction manuals aren't the easiest to understand (for anything) but there are a ton of user videos all across the interwebs showing you how to set up/run the 3018. (seriously, if you need to learn anything, ever, about anything, ever, just YouTube or TikTok that ish)Out of box - I was a bit anxious. Any time you're opening a package that has hundreds of tiny parts it can seem like an uphill battle. If you dedicate a half hour or so of watching a set up video (all the way through), then setting it up while watching it again, it makes this set up a breeze. I had mine completed in about an hour, and after a minor issue was up and running. The V Bits that come with the machine are what I use most for cutting out designs. I also purchased some straight bits to use which, to me, are necessary if you're cutting out large pockets of material. As far as while this machine is running, people have mentioned noise quite often in reviews. I did not find the noise to be overwhelming. I have the 3018 set up in a room inside my house, and with the door shut, it doesn't disturb us at all.I use a Mac currently. I hate it, I was born and raised on a PC. So far I have found that Easel (it's a free application from inventables) is the easiest and most user friendly application to send G-Code, or your designs, to the machine. It's also incredibly user friendly for creating new designs for your 3018 if you're less than a novice and don't use any number of graphic suites (inkscape, illustrator, photoshop) along with Fusion 360 to create toolpaths for your designs. Windows users have a ton of more options to utilize your machine while connected to a computer, or you can upload your codes to the controller that comes with the machine to create your projects.I have used the 3018 quite often in the month I have had it. As always, there is trial and error involved. There is a learning curve when it comes to types materials to cut/carve at what speeds, and what types of bits to use. As you try a few projects here and there, you'll get much more comfortable about what to cut, and how to cut it. You can research and read about spindle speeds/materials/bits as much as you want, but you'll inevitably learn more from trial and error after having that basic knowledge from your prior research. So far I have mainly used MDF for my projects, though when attempting to use it on acrylic and copper, I can see the vast potential this machine has.CUSTOMER SERVICE for this product awesome. I had an minor issue during set up, and I was sent a replacement part incredibly quick. I was up and running the same week I received the machine. I have seen reviews complaining, but my experience reflects all of the glowing reviews about the help I received.This isn't a plug and play machine. You have to set it up. You have to learn it. At the price point, and with the capabilities this machine has - it is the PERFECT starter machine to get into the world of CNCs. All I can say is that you won't regret this if you try it. I'll upgrade the bed of the machine for larger projects, and eventually invest in the laser module to play with that as well. I would definitely recommend this machine and I would buy it again.
J**O
Value vs Cost A Plus
I have purchased this to introduce my grandson to the world of automated machining. Given the price and general/overall high ratings of the product it looked as it would fulfill that need.Here is my first installment of rating the product. I have only opened the box and read the assembly instructions to date as I want this to be his "discovery". The product comes very well packed and ordered so first impressions are good. The assembly booklet is "picture book" oriented but because of the simplicity of the product assembly it is easily understood. There is only one measurement that seems to be called out and it is the placement of the gantry in relation to the rear mounts. There is only one caution and that is related to not over tightening the spindle motor collar. I think I read somewhere that these are 3D printed so one can over tighten and crack the mount. A driver software disc comes with the system to pair the unit to one's computer. I have not exercised that element as of yet.Once assembled we will exercise the unit with downloadable grbl code to test it out. We are in the process of choosing a design software package, preferably freeware. The candidates so far are Easel and Carbide Create. He has Solid works at school so at some point we will try and interface to that. In the back of my mind I am also looking at Corel Draw but I perceive at this point that we will have to have a converter from say DXF export to grbl. These seem to be readily available.I am not sure we will investigate the laser accessory for this unit due in part to its low power and its inability to cut through all but the thinnest stock.Ok it is a few weeks later and we have finally got this connected to a Windows 10 computer. Using the manual control functions of the grbl software handling system we are now able to control the Y, Z and X axis. That was encouraging as it did not come up the first few tries. We can't explain the failures the first few times other than to say the software is not "turn key" for the casual user ( I can say that with confidence because I was the manager of real time software development in my former life). I have never understood why the Chinese do not hire an English speaking translator to write the user manuals. Sainsmart is better than others but the grammar structure at times needs some cross outs and changes.At the moment we are going to add the necessary limit switches to protect the drive system as I didn't force the situation but I think I could have driven the Y travel into the frame using the manual control.It is now 8/17 and I have yet been unable to run any of the test code. Upon trying the Sainsmart logo all it does is turn on the spindle motor, jog a few mm shut the motor off, jog and repeat. I asked for help and the response asked me to send a video. I didn't think that was going to prove anything. I then tried the Wheel test code. It executed only the first step (downloaded the next step) and stopped aand left the spindle motor turning at what I assume is the correct speed. At that point I received an error code; “1: % <error:1” . The error windows gives a choice to ignore or abort. I never ignore error codes. And as one would have it there are no error code/clearance listings in the g code. All else works I can manually drive the X/Y/Z and spindle motor. I can also interrogate the controller for its parameters. All are as shown in the sample files. I have yet to hear from Sainsmart.A word to the wise. This is not a turn key system and maybe I can live with that if only I had sufficient support and support information. For the moment I am downgrading from 5 to a 4 rating.An update 8/25: I am amazed that few if any are having the problems I have been having. It can't be me or can it! Anyway I finally got the WHEEL test code to work by deleting the code "demarcation characters, the % symbol, at the beginning of the g code and at the end. The test code ran and it appears it followed the simulation path of the GUI. Yet I am still unable to run the Sainsmart logo. It seems to execute the code but there is no correlation between the GUI path and the actual tool path. It does not want to traverse the X axis??? Here is another data point I just noticed that the manual Y JOG function traverses opposite to what the screen UP/DOWN arrows. Any one else seeing this? I do not recall this action early on. I did not change the Y axis drive bit either, Cables are identical and connected correctly.Here it is 1/2/2020 and I am back at it. Sainsmart sent me a new board. So far it didn't work. I put the old board back in as I had wanted to try importing some DXF (laser files) through a very user friendly application called Easel. This application although simple is much more user friendly than Candle. In using it I was alerted to the fact that the Y Axis drive was reversed polarized. Through Easel I could change it and store the new value on the controlled board. Quite to my delight that has been the problem all along with the controller. It now runs the Sainsmart Logo as well as the others.I will leave the rating as a 4 for the time being although if I were to rate this system from a turn key perspective I would give it a '1'! Sainsmart has a long way to go in this area.This is an update as of 12/2020. The unit had to be put aside for more pressing work elsewhere until this period. Recall the struggle with the Y axis direction was reversed causing the unit to either operate incorrectly (reversed from the screen graphic)with such things as a circle or strangley with non symetic elements. After researching the EEPROM settings of the unit we were able to permanently reverse the sense of the Y axis motion permanently. This has cleared up all the previous issues related to this. I will leave the rating as a 4 since this points to poor quality control of the manufactured unit.
ترست بايلوت
منذ أسبوع
منذ 3 أيام