🚿 Elevate your daily routine with the DreamLine Enigma-X — where luxury meets precision.
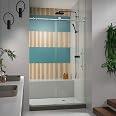
The DreamLine Enigma-X is a fully frameless sliding shower door featuring 3/8 inch thick ANSI certified tempered glass with exclusive ClearMax water and stain resistant coating. Designed for a spacious, modern look, it includes a large wheel assembly for smooth sliding and a stainless steel top guide bar adjustable up to 4 inches. The reversible door installation offers versatile setup options, backed by a limited lifetime warranty.


| Brand | DreamLine |
| Color | Brushed Stainless Steel |
| Material | Tempered Glass, Stainless Steel |
| Style | Enigma-X |
| Item Weight | 138.89 Pounds |
| Assembly Required | No |
| UPC | 815324010525 |
| Global Trade Identification Number | 00815324010525 |
| Manufacturer | Dreamline - Dropship |
| Part Number | SHDR-61487610-07 |
| Item Weight | 138.9 pounds |
| Product Dimensions | 0.38 x 48 x 76 inches |
| Country of Origin | China |
| Item model number | SHDR-61487610-07 |
| Is Discontinued By Manufacturer | No |
| Size | 44-48 in. W |
| Finish | Brushed Stainless Steel |
| Pattern | not_applicable |
| Shape | circle |
| Voltage | 110 Volts |
| Wattage | 200 watts |
| Installation Method | Alcove |
| Item Package Quantity | 1 |
| Certification | ANSI Certified Tempered Glass |
| Usage | Indoor use only |
| Included Components | Stationary Panel and Sliding Door |
| Batteries Included? | No |
| Batteries Required? | No |
| Warranty Description | Limited lifetime manufacturer warranty |
J**B
Beautiful door and not as scary of an install as some would have you believe.
It took my dad and I about 6 hours to install the Enigma shower door. I would say that I am very handy being that I've built and designed two houses before. A lot of time was devoted to checking and rechecking that everything was level and reading the instructions several times to make sure we didn't forget anything. The instructions were very clear and helpful.I think that someone with good DIY skills could put this together without having to hire someone. Don't let some of these other reviews scare you. Challenge yourself, but take your time. There are just a few tips I would like to share:- The first step requires you to cut the metal guide bar to your finished opening. If you don't already have one, you can get a good Dewalt hacksaw from Home Depot for around $25. Heck you already spent $800 on the door. With the hacksaw you'll probably need a table vise to hold the bar steady when you are cutting. I scored the bar first with some pipe cutters so that I didn't cut too crooked. Cutting the bar took about 10 minutes. It helps if you rotate the bar and cut in a new position if your blade keeps getting caught when the cut gets too deep.- Keep those glass edges cushioned. No matter how careful you are someone is liable to bang the glass corner on a wall or drop it too abruptly against the floor because the glass is so heavy. I would go as far as taping on some more cardboard or sill seal on to the corners when moving it around. We chipped one of our corners, but luckily the nylon anti-water strips covered up the damage. We we were lucky the whole thing didn't shatter.- Drilling through marble, porcelain, or ceramic, you need some good drill bits. There are some "glass and tile bits" that they sell at Home Depot with the blue heads. Those are NOT made for porcelain tile. You might be able to get through marble tile, which is a softer material than porcelain, with those things but it will still take you a long time. Get the carbide drill bits made for drilling through tile. Tile drill bits are made to be used on a lower RPM setting and with the hammer setting of your drill. I put my cordless drill down to the lowest power setting.- After getting the stationary glass up, we found that it was out of level horizontally by about 3/16" over 6'. The bubble was still within the lines of my level so I thought no big deal. In hindsight, I should have just adjusted the guide rail brackets in or out to get the glass level again because after I put the moving glass door part up it rubbed against the bottom guide block. It wasn't an awful noise, but I wanted it to have no noise at all. Not wanting to take everything down again and risk smashing the glass, I cut a small piece of velcro (the fuzzy side, not the scratchy side) and slid it in between the bottom guide block and the glass door. To keep it locked in place, I put a small bead of silicone on the back of the velcro before I slid it in. It worked like a charm. No noise when sliding the door.- Our floors were somewhat level, but there was a low spot. Before final placement of the stationary glass, I ran a thick bead of silicone on the low spots to provide some cushion for the stationary glass.- You walls have to be decently level, but not perfect. As long as it's not out of level by more than 3/16" over 6', then there's nothing some silicone caulk can't seal. This may be obvious, but I would recommend putting the sliding door on the same side as your shower head to limit the amount of water that could potentially splash out.- Our shower was a curbless shower, but after placement of the "anti-splash threshold," we now have a 1/4" curb. We probably could have done without it, but it's a very minor tripping hazard. Ha.- Before applying the thread lock onto your door stoppers, make sure you have them exactly where you want them. I tried to adjust one of the door stoppers after applying the thread lock and the set screw wouldn't budge. We put rubbing alcohol into the hole and waited a few minutes and were then able to pry it loose. If all else fails, you'll probably need to get an allen wrench set that has a thicker handle to give you more torque.All in all, it was no as difficult as some other reviewers made it out to be. Although, my perspective may be skewed a little bit because I still think of myself as a DIY'er when I may be more of a professional now.
L**N
This shower door was the perfect finishing touch to a master bath facelift
This shower door was the perfect finishing touch to a master bath facelift. The house was built in the mid 80's and the original shower an embarrassment for a master bath. It was a cramped 32" square affair sporting that stylish 4" square white tile of the time, enclosed with a cheap Plexiglas framed door that seemed to be a magnet for soap residue goo. A failed shower pan triggered a full blown gut & remodel that permitted us to change the room layout to something more usable and appealing. We expanded the shower to 3'x5' and tiled with a darker tile and oil rubbed bronze fixtures for a more dramatic effect. The result was as elegant as we'd hoped, but it also called for an enclosure that would enhance the appearance. Enigma-X was the first frameless sliding glass door that came up in my search and the one I kept coming back to on the quest. Though it wasn't available in ORB as the rest of the bathroom is outfitted with we took the plunge anyways and we're glad we did. It looks fantastic, glides like a dream and from the glass to the hardware screams quality. And for only $800 with free delivery? No brainer if you ask me.I'm a DIY guy with years of remodeling experience under my belt, but based on some of the other reviewers comments decided to let the pros handle this install. Took a while to locate a glass company that would install a product not purchased through them, but finally found a winner in Fuquay Glass. The crew that came exceeded my expectations on every level and the outcome of their work nothing short of exceptional as I hope the picture shows.To wrap it up, I would not hesitate to purchase this product again nor hesitate to recommend it to others. And if you live in the Raleigh,Durham NC area, I highly recommend Fuquay Glass. I'd use their services again in a heartbeat.
M**L
Very nice, but get a professional bid before you order, no joke
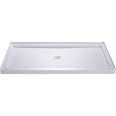
Very nice, great quality, the procedure to install is a little squirrely, I would prefer some measurements to help. First off, you need at least one strong friend to help with the install, it will take a while. If your walls are not flat and not plumb, like totally flat and plumb you will have major issues, Really. Even cutting the top rail is a precision procedure, I installed this myself, but I've been building for a while and have done some pretty big projects, even so it took me a while. THE FIXED SIDE IS LOAD BEARING, IF YOUR FLOOR ON THAT SIDE ISN'T PERFECTLY FLAT AND SMOOTH IT WILL BREAK, the doors are heavy, if you aren't starting with a pre-fab base I would find another system. It turns out that my wall wasn't totally square to the floor so I had a gap on the fixed side, I was able to buy a sheet of 3/8ths acrylic which I was able to scribe a filler piece from and silicone in place, it came out well, but it took some doing. Very happy with the results, but there were about six times that I could have been up a creek had I been off even a little bit.
ترست بايلوت
منذ 3 أيام
منذ شهرين