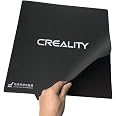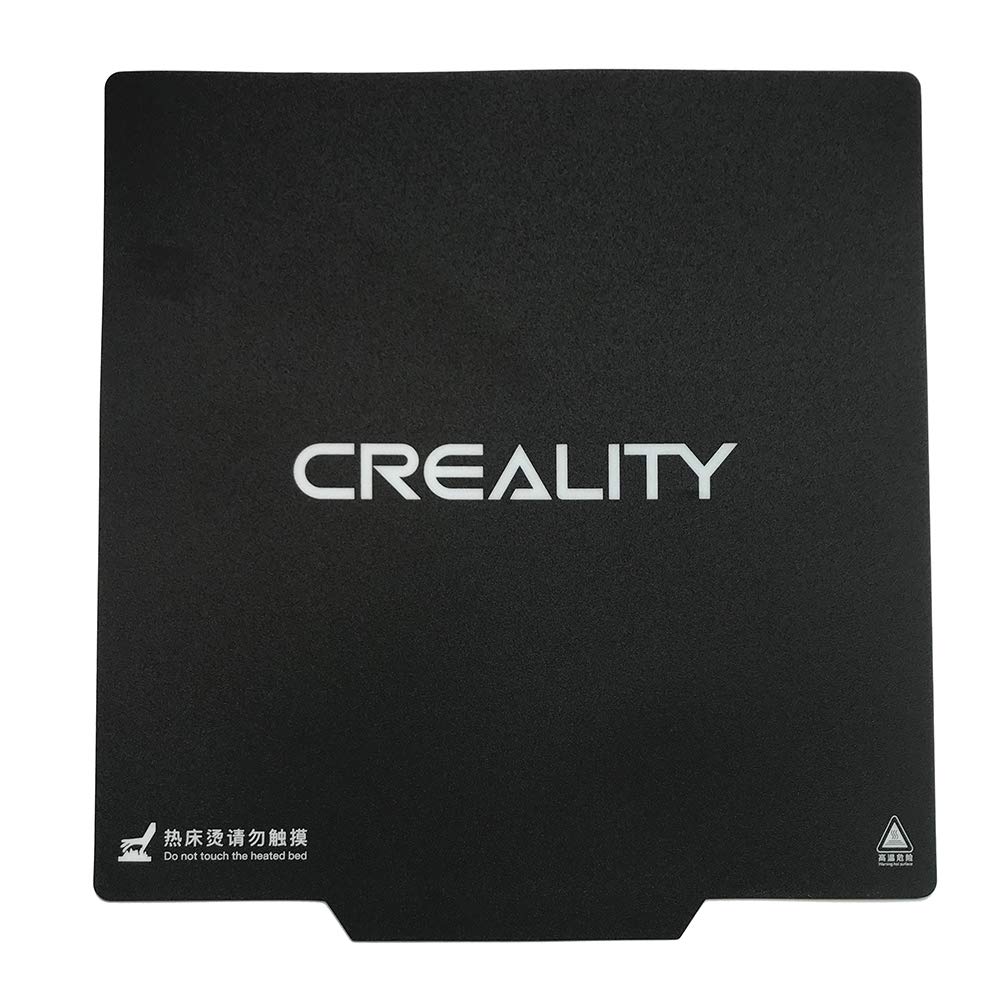

🖨️ Print, Bend, and Impress!
The Official Creality Ultra-Flexible Removable Magnetic 3D Printer Build Surface is a revolutionary heated bed cover designed for various 3D printers, including CR-10, Ender 3 Max, and more. With its innovative magnetic design, model removal is effortless and hassle-free. The surface is customizable, easy to install, and compatible with all FDM printer models, making it a must-have for any 3D printing enthusiast.
M**Y
This is the best print surface I've ever used.
I bought this for my CR-10 when I was having bed adhesion issues with the stock glass. -- I've been 3D printing since 2011 and this is by far the easiest and most hassle free print surface I have EVER used -- it's really forgiving when it comes to bed leveling -- and you don't need to use anything special to make the parts stick (no glue stick or chemicals or hair spray or anything). -- Part removal is pretty easy as well -- you just wait for it to cool and if the parts don't pop off on their own, peel up the bed and then flex it. -- It's great. -- It's much better than PEI or glass, IMHO.I've only had to use the spatula on this surface a couple of times, because I needed to remove something that was a single layer thick that I printed, and it was flexing with the surface -- and even then 99% of it still peeled off on it's own there was just a little bit that got stuck and needed the spatula, and the surface held up really well to that (it didn't create a smooth spot or anything, so it seems to be of decent quality / robustness, it's not like sandpaper that will wear out easily or something).My creds:Again, I've been 3D printing since 2011... mostly on tempered glass, but also regular glass, and PEI -- I still haven't tried mirrors (I've heard they're good for PLA, but I just haven't been able to source one in the right size for any of my printers). -- I've used auto bed leveling and manual with all sorts of probes (and lack thereof) across 3 different printers (SeeMeCnc H-1, Mendel 90 Repstrap, and a CR-10) -- I've even printed on crazier stuff like an unheated injection molded sheet of ABS plastic (back in the crazier DIY days, we tried all sorts of stuff -- I do not recommend printing on a plastic sheet at all, btw 😅). -- I've used hair sprays, glue sticks, ABS goops, 3DLac, and nothing but a bed cleaned with alcohol -- And I have to say this is by far the easiest surface I've ever printed on. -- No prep needed, just do a visual inspection to make sure it's clean.Also the heat transfers REALLY well, like, if you don't wait for it to cool down after a print, you can totally burn yourself (just like your regular print bed already can). -- So any heat loss seems to be negligible. -- If you really need that print off there fast, and want to remove the bed to flex it (like while it's still hot), consider using oven mitts. 😅I highly recommend this product. ⭐⭐⭐⭐⭐(Disclaimer: I was *not* paid or compensated in any way for this review, I bought this product with my own money, and I gain nothing if you buy it -- except maybe that the 3D printing community will continue to grow and thrive, and maybe in the time that you save -- not having to futz with your print bed -- you'll make a cool 3D model and I'll end up printing it one day. -- That's a nice thought. 🙂)
B**F
Works great, even with no heat.
Works great. I've been useing it non-stop with no heat bed turned on my 310x310 bed. No glue, hair spray, or tape is required. If you don't know how to level your bed, and also fix all the common flaws such as bed screws nuts not properly tight under the bed it self before the spring and the bed travel being smooth, then yes you going to have issue, even with the best of stuff. Learn to fix your bed properly before blameing a bad product.I'm total blind and installed this with no help went on smooth and straight, just pell one coner while keep it straight on bed, then pill the other coner, then slowly pull the backing forward slowly while smoothing the mat. mine went on perfectly straight doing this. Also make sureyou clean the surface befor doing so.You can print PLA with no heat on the bed, I found this out with a cheap $70 3d printer that didn't have a heated bed, and if you do everything correctly you cn do it evne on a full size bed. I simply print, then just pop the mat up a bit and the model pops off with no mess left, and I just use a paper towel with a bit of cleaning and let dry then start the next print. I use a brim sometimes and sometimes no brim. I've printed models that was 390mm tall and had no issue.PLA PLA Plus Keep in mind, this is for only doing PLA and PLA +, even did PPU with no issue. However, don't expect to be able to print things that goes over 70C for bed temp. I've not try ABC, as it shrinks, so will not try.Word of advice, if you wnat to not stick this to your bed it self, order a extra printing plate and put the sticker mat on to it on the smooth side and then you can always change your printing plate for those high tmep stuff and not worry about messing up the magnet stuff. Also just remeber to account for the Z height, inject a g code of 211 s0206 z-10.0when useing the glass and this product on top, change the 206 code to what you need to get to the perfect level of the bed. the first code is to disable the z switch.
A**R
PLA sticks really well. Almost too well.
I used a high-ductility PLA and it stuck to the bed great (bed heated to 60C). I printed a brim which stayed on the surface and I have yet to remove it (I'm scraping off a little at a time). I'd suggest printing without a brim for PLA parts.I bought this for ASA. At 90C and with a brim, my ASA temperature tower held on to this longer than my textured glass/PVA glue sheet. It eventually broke loose from the bed, but this was my first attempt with no additives, and it was a part with a tiny area of contact with the bed. I believe I'll be able to get it to work.On My CR-10 (v2), I can leave the magnetic base stuck to the bed, and still fit the OEM glass bed over it. It's snug, but it fits. I'm glad I have a low-cost alternative surface, but it's going to complement my textured glass bed, not replace it. At least yet. It also requires some surface treatment for ASA (all print surfaces probably will, I think).
C**S
Really good bed just be careful leveling
This bed is perfect for people who know how to use it. Everyone saying that it’s bad didn’t use it correctly. I had a few issues my first time around but once I got the hang of it it was simple.1. Don’t level with hot nozzle, it will burn right through if you’re not careful, I first leveled cold and set it to .15mm with a feeler gauge and then heat it up once I knew the nozzle wouldn’t hit the pad and then level it to .1mm2. When putting on the sticky pad start with one corner line it up then slowly peel and smooth it out so that you leave no air bubbles it is very sticky and very hard to remove once it’s on I messed up and had to order a new one3. When removing a print make sure you’re not folding the pad I’ve seen people say that it creases and yes it does. Bend it slightly until some part of the print starts to lift then peel off the print on a flat surface if you’re not able to remove it without folding.Overall 10/10 in my experience
B**N
Good
Good
Trustpilot
2 months ago
3 weeks ago